
WooCommerce (módulo de WordPress)
¿Te gustaría mejorar aún más tu software de afiliados? Descubre la integración de WooCommerce (módulo de WP) para Post Affiliate Pro.
10 min de lectura
WooCommerce
WordPress
+4

Aprende cómo integrar tu tienda de Wix con Post Affiliate Pro para rastrear pedidos, personalizar páginas de agradecimiento y añadir códigos de seguimiento de clics. Mejora tus capacidades de e-commerce con una integración de marketing de afiliados sin complicaciones.
Sé el primero en conocer las nuevas funciones y actualizaciones del producto.
Crea un sitio web gratis con Wix.com. Elige una plantilla impresionante y personalízala a tu gusto con el creador de sitios web de Wix—no se necesitan conocimientos de programación.
Esta integración describe cómo integrar la tienda de Wix. Si usas Ecwid o botones de PayPal dentro de Wix, utiliza los métodos para esas soluciones.
Inicia sesión en tu panel de Wix y edita tu sitio. Una vez que cargue el Editor, en el menú de la izquierda haz clic en el botón Mi tienda, luego ve a Páginas de la tienda y abre la Página de agradecimiento.
Cuando se haya cargado la Página de agradecimiento, haz clic en el botón Agregar en el menú de la izquierda y, en la sección Más, selecciona Embeds y desde ahí añade el elemento HTML iframe a tu página de agradecimiento.
Ahora, en la barra superior del editor, busca Modo Dev y haz clic en el botón para Activar el Modo Dev. Con el Modo Dev habilitado, haz clic en la barra Código de la página de agradecimiento que ha aparecido en la parte inferior de la pantalla.
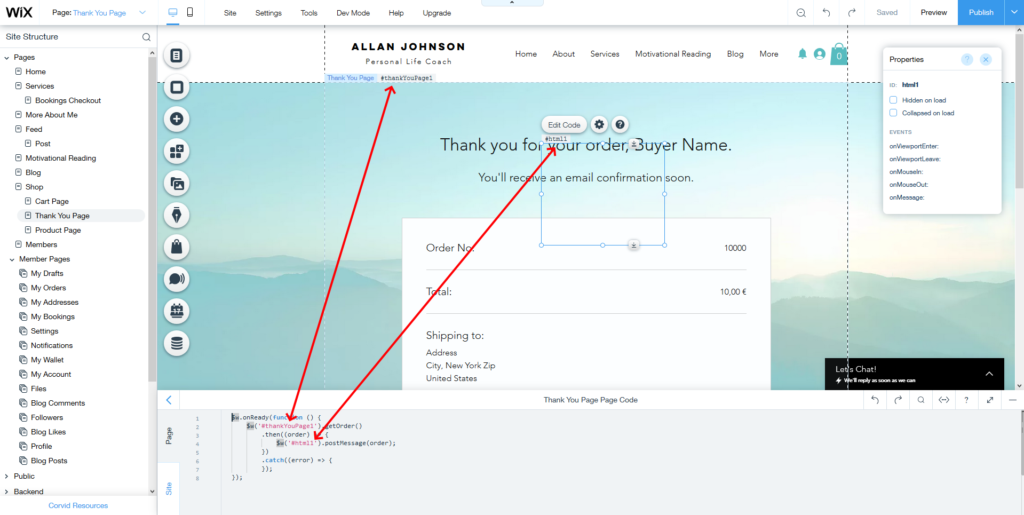
Reemplaza el código en esta sección por el siguiente, donde debes reemplazar #thankYouPage1 y #html1 por los IDs de tus propios elementos como se muestra en la captura de pantalla a continuación.
$w.onReady(function () {
	$w('#thankYouPage1').getOrder()
		.then((order) => {
			$w('#html1').postMessage(order);
		})
		.catch((error) => {
		});
});
Aún en el editor de la página de agradecimiento, introduce el siguiente código en el elemento HTML que has añadido a tu página:
<script id="pap_x2s6df8d" src="https://URL_TO_PostAffiliatePro/scripts/trackjs.js" type="text/javascript"></script>
<script type="text/javascript">
                   window.onmessage = (event) => {
                     if (event.data) {
                      var orderObject = event.data;
                      var totalCost = 0;
                      var productIds = [];
                         for (i = 0; i < orderObject.lineItems.length; i++) {
                              totalCost += orderObject.lineItems[i].totalPrice - orderObject.lineItems[i].discount;
                         if (orderObject.lineItems[i].taxIncludedInPrice === true) {
                              totalCost -= orderObject.lineItems[i].tax;
                         }
                         if (orderObject.lineItems[i].sku != undefined) {
                              productIds.push(orderObject.lineItems[i].sku);
                         } else {
                              productIds.push(orderObject.lineItems[i].productId);
                         } }
                         PostAffTracker.setAccountId('Account_ID'); var sale = PostAffTracker.createSale();
                         sale.setTotalCost(totalCost);
                         sale.setOrderID(orderObject.number);
                         sale.setCurrency(orderObject.currency);
                         sale.setProductID(productIds);
                   if (orderObject.discount !== undefined && orderObject.discount !== null && orderObject.discount.appliedCoupon !== undefined && orderObject.discount.appliedCoupon !== null) {
                      sale.setCoupon(orderObject.discount.appliedCoupon.code);
                      }
                PostAffTracker.register();
               }
            }
</script>
Si deseas rastrear el correo electrónico, teléfono o nombre del cliente, puedes utilizar las variables orderObject.buyerInfo.email, orderObject.buyerInfo.phone, orderObject.buyerInfo.firstName, orderObject.buyerInfo.lastName.
Consulta la documentación de Wix para ver un ejemplo del objeto orderObject completo.
Una vez que hayas añadido los códigos, publica la página.
Aún en el editor de la página de agradecimiento, introduce el siguiente código en el elemento HTML que has añadido a tu página:
<script id="pap_x2s6df8d" src="https://URL_TO_PostAffiliatePro/scripts/trackjs.js" type="text/javascript"></script>
<script type="text/javascript">
	window.onmessage = (event) => {
		if (event.data) {
			var orderObject = event.data;
			PostAffTracker.setAccountId('Account_ID');
			for (i = 0; i < orderObject.lineItems.length; i++) {
				totalCost = orderObject.lineItems[i].totalPrice - orderObject.lineItems[i].discount;
				if (orderObject.lineItems[i].taxIncludedInPrice === true) {
					totalCost -= orderObject.lineItems[i].tax;
				}
				if (orderObject.lineItems[i].sku != undefined) {
					productId = orderObject.lineItems[i].sku;
				} else {
					productId = orderObject.lineItems[i].productId;
				}
				var sale = PostAffTracker.createSale();
				sale.setTotalCost(totalCost);
				sale.setOrderID(orderObject.number + '(' + i + ')');
				sale.setCurrency(orderObject.currency);
				sale.setProductID(productId);
			  if (orderObject.discount !== undefined && orderObject.discount !== null && orderObject.discount.appliedCoupon !== undefined && orderObject.discount.appliedCoupon !== null) {
			    sale.setCoupon(orderObject.discount.appliedCoupon.code);
			  }
				if (i < orderObject.lineItems.length -1) {
					sale.doNotDeleteCookies();
				}
			}
			PostAffTracker.register();
		}
	}
</script>
Si deseas rastrear el correo electrónico, teléfono o nombre del cliente, puedes utilizar las variables orderObject.buyerInfo.email, orderObject.buyerInfo.phone, orderObject.buyerInfo.firstName, orderObject.buyerInfo.lastName.
Consulta la documentación de Wix para ver un ejemplo del objeto orderObject completo.
Una vez que hayas añadido los códigos, publica la página.
El último paso es añadir el código de seguimiento de clics a todas las páginas de tu sitio web Wix. Para hacerlo, navega a tu panel de Wix y luego a Configuración > Código personalizado.
En la pantalla que se abre, pega el código que puedes obtener en tu panel de comerciante de Post Affiliate Pro en Herramientas > Integración > Seguimiento de clics y añádelo al final del cuerpo para que se cargue en todas las páginas una vez.
Wix es una plataforma integral para la creación y gestión de sitios web que permite a los usuarios construir sitios profesionales fácilmente. Establecida en 2006, Wix ofrece un editor intuitivo de arrastrar y soltar, edición de sitios móviles y una amplia gama de funciones de diseño. Con más de 900 plantillas profesionales, la plataforma se adapta a una amplia variedad de industrias y propósitos. Ya sea que necesites capacidades de eCommerce, integración SEO, herramientas de blogging o gestión de portafolios, Wix proporciona las funcionalidades necesarias para apoyar tu presencia en línea.
Wix fue fundada por Avishai Abrahami, Nadav Abrahami y Giora Kaplan con la visión de hacer accesible la creación de sitios web para todos. Los hitos clave en la historia de Wix incluyen:
Wix atiende a una audiencia diversa, incluyendo:
Para organizaciones más grandes, Wix ofrece Soluciones Empresariales con planes personalizados adaptados a necesidades y escalas específicas.
Los usuarios suelen destacar de Wix:
Sin embargo, algunos usuarios han notado:
Wix vs Squarespace | ¿Cuál es el mejor creador de sitios web?
Reseña de Wix E-commerce | ¿Deberías usar Wix para tu tienda en línea?
Si estás explorando otros creadores de sitios web, considera estas alternativas:
Cada plataforma ofrece características y estructuras de precios únicas, por lo que es esencial evaluar cuál se adapta mejor a tus necesidades específicas.
Lucia es una talentosa editora de contenido que garantiza la publicación fluida de contenido en múltiples plataformas.

Experimenta una integración de afiliados sin complicaciones con Wix y Post Affiliate Pro. Comienza tu prueba gratuita de 30 días hoy y potencia tu negocio en línea.
¿Te gustaría mejorar aún más tu software de afiliados? Descubre la integración de WooCommerce (módulo de WP) para Post Affiliate Pro.

¿Te gustaría mejorar aún más tu software de afiliados? Descubre la integración de ShopSite para Post Affiliate Pro.

¿Te gustaría mejorar aún más tu software de afiliados? Descubre la integración de PayPro para Post Affiliate Pro.
Únete a nuestra comunidad de clientes satisfechos y brinda excelente soporte al cliente con Post Affiliate Pro.
Consentimiento de Cookies
Usamos cookies para mejorar tu experiencia de navegación y analizar nuestro tráfico. See our privacy policy.